[컴][웹] AWS CLI 로 s3 에 파일 업로드 하기

file upload / upload files / how to back up using aws cli with s3

AWS s3 에 파일 upload

AWS CLI 설치

update 2023-01:

v1 에 대한 설치:

여기서는 virtual env 를 이미 만들었다는 가정하에 작업을 한다.(가상환경 설정은 여기 를 참고하자.)

pip install awscli --upgrade

설치가 완료되면, aws --version 으로 설치가 잘 됐는지를 확인할 수 있다.

(mycli) c:\a\envs\mycli\Scripts>aws --version
aws-cli/1.16.114 Python/3.6.3 Windows/10 botocore/1.12.104

aws configure

aws configure 를 통해서 access key 랑 access key ID 를 설정하게 된다. region 정보는 여기서 보고 정해주자(region 정보) output format 의 기본값은 json 이다.

(mycli) c:\a\envs\mycli\Scripts>aws configure
AWS Access Key ID [None]: ADDFSDFDSFSKI
AWS Secret Access Key [None]: Tqq+DeDFSDFFDggf2cptQ3e/gn
Default region name [None]: ap-northeast-2
Default output format [None]: json

아래처럼 profile 을 설정할 수 있다. 'myprofile' 이라는 이름의 profile 을 만든다.

aws configure --profile myprofile

access key

IAM 에서 user 를 만들면 access key 와 secret access key 를 얻게 된다. 이때 policy AmazonS3FullAccess 만 추가해 주면 된다.

TCP port 443

AWS CLI는 TCP 포트 443에서 HTTPS를 사용하여 AWS 서비스에 요청한다고 한다. 그래서 방화벽에서 이부분의 제한이 걸려있는지 확인이 필요하다.

aws s3 cp

이제 aws cli 를 사용해서 upload 를 해보자. my-first-backup-bucket 라는 bucket 에 'my first backup.bak' 를 upload 하는 경우라면 아래처럼 하면 된다.

aws s3 cp "C:\users\my first backup.bak" s3://my-first-backup-bucket/
aws s3 cp "C:\users\my first backup.bak" s3://my-first-backup-bucket/ --profile myprofile

삭제는 아래처럼 하면 된다.

aws s3 rm s3://my-first-backup-bucket/

참고로 같은 이름의 파일을 올리면 overwrite 된다.

See Also

  1. s3 — AWS CLI 1.16.114 Command Reference
  2. 쿠...sal: [컴] aws IAM 에서 계정 만들기

[컴] iOS 보안-시스템 보안

iOS 부팅 절차 / boot time / booting process / enclave


ref. 1 의 System Security 의 일부를 번역했다. 자세한 내용은 ref. 1을 보도록 하자.
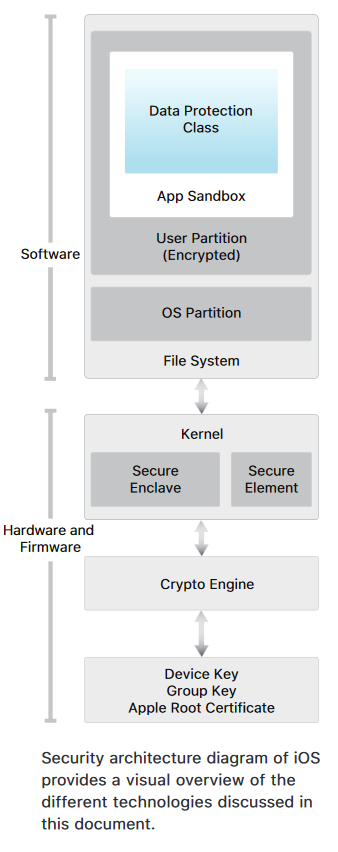
iOS 보안-시스템 보안

기기암호화(device encryption) 는 기본적으로 설정되어 있으며, 설정을 변경할 수 없다.

Secure Boot Chain

  1. iOS 켜기
  2. --> AP 가 Boot ROM 의 code실행
    1. the hardware root of trust 라고 알려져 있다.
    2. the chain of trust 의 첫번째 단계(first step) 이다.
    3. 이 code 는 변경불가능(immutable code)
    4. 칩제조(chip fabrication) 때 만들어 진다.
    5. implicitly trusted
    6. Apple Root CA public key 를 가지고 있다.
      1. 이 public key 는 iBoot bootloader 가 load 되기 전에 Apple 에 의해 서명(sign) 됐다는 것을 확인(verify) 하는데 사용된다.(아래 boot-time verification 참고.)
  3. Boot ROM 에 의해 추가적인 Low-Level Bootloader(LLB) stage 가 load 되고, 확인(verify) 된다.
    1. A9를 포함한 A9 이전의 A시리즈 processor 에만 존재.
  4. 만약 Boot ROM 이 LLB 또는 iBoot 을 load 하는 것을 실패하면,  기기는 DFU mode (Device Firmware Upgrade)로 들어가게 된다.
    1. 오래된 기기들에서 LLB 를 load 하는 것을 실패 하거나,
    2. 새로운 기기들에서 iBoot 을 load 하는 것을 실패하는 것
  5. LLB 나 iBoot 이 다음 작업(next step) 을 load 하거나 verify 하는 것을 실패하는 경우
    1. startup 은 멈춰지고(halt) iTunes 에 접속하라는 화면이 보여진다. 
    2. --> recovery mode 이다.
  6. DFU mode 로 가거나, recovery mode 로 들어가면, USB 를 이용해서 iTunes 에 접속해서 "공장 기본 세팅(factory default settings)" 로 복구되어 져야만 한다.
  7. 기기가 Recovery Mode 와 DFU Mode 로 들어가기 전에 The Boot Progress Register (BPR) 가 update 된다. 이 update 된 값을 보고 Secure Enclave 가 user data 에 대한 접근제한을 하게 된다.
    1. Recovery Mode
      1. A10, S2 그리고 최신의 SoCs 를 가진 기기에서 iBoot 에 의해 BPR 이 set.
    2. DFU Mode : A12 SoC 를 가진 기기에서 Boot ROM 에 의해 BPR 이 set.
  8. --> iBoot 이 일들을 마치면
  9. --> iBoot 은 iOS kernel 을 확인(verify) 하고, 실행한다.

baseband subsystem 또한 이것과 비슷한 자신의 secure booting 을 이용한다.
Secure Enclave coprocessor 또한 secure boot process 를 이용하고, 그로인해 그것의 분리되 소프트웨어가 verified and signed by Apple 되었다는 것을 확신시켜준다.
secure boot


시스템 소프트웨어 권한부여(System Software Authorization)

만약 과거버전의 iOS의 설치가 가능하다면 해커는 과거버전의 iOS를 깔고 권한을 가져올 수 있다. 이것을 막기 위해서 iOS는 System Software Authorization 을 이용한다. Secure Enclave 도 이것을 이용한다.


iOS update

iOS update 는 2가지 방식(iTunes, OTA) 으로 가능하다.
  • iTunes 로 업데이트를 할 때
    • iOS image 전체를 download 
    • Content Caching 옵션을 켠 macOS High Sierra 를 돌리는(run) Mac 을 사용한다면, 미리 cache 되어서, iOS 의 update 를 바로 할 수 있게 해준다.
  • OTA 로 할 때: patch 를 할 내용만 다운로드한다. 

installation authorization server

iOS update 할때 기기는 Apple 의 installation authorization server 에 접근한다.
그리고 다음 3가지를 확인 한다.
  1. bundle의 measurements: 설치될 installation bundle들에 대한 암호화된 measurements(측정)
    • installation bundle : iBoot, kernel, iOS Image
  2. nonce : signed data 를 가져다 다른 기기에 쓰는 것을 막아주고, system software 를 변경하지 못하게 막는다.
  3. ECID: 기기의 고유한  ECID(Exclusive Chip Identification) 를 서버로 보내게 된다.

installation authorization server 에서 하는일

서버에서는  이 installation bundle 의 버전들이 맞는 구성인지를 확인한다. 예를 들면 특정버전의 iBoot 은 특정 version 의 kernel 을 써야만 하는식이다. 이렇게 버전이 맞으면 이 measurement 에 ECID 를 더해서 sign 을 하고 이 sign 된 data 를 기기에 보내준다.
sign(measurment + ECID) ---> device

boot-time verification

위에 설명한 startup process 가 "Apple 이 sign 한 code" 만 기기에 설치되는 것을 보장해 준다.
  • Apple 의 signature : boot time 에 일어나는 chain-of-trust evaluation 은 Apple 의 signature 를 verify 한다.
  • disk 에서 load 되는 item 의 measurement: "disk 에서 load 되는 item 의 measurement (기기의 ECID를 이용해서 만들어져 있다.)"와 "signature 에 의해 감싸진 measurement(위의 installation authorization server 에서 받은)"가 맞는지를 verify 한다.
이 절차들이 특정기기에 대한 authorization 을 해주고, 기기에서 옛 iOS버전이 다른 곳으로 copy 안되도록 한다.

Secure Enclave

  • Secure Enclave 는 보조 프로세서이다. 
  • SoC 안에 들어있다.(fabricated)
  • 암호화된 메모리를 사용
  • 하드웨어 난수발생기(random number generator) 를 포함.
  • Secure Enclave Boot ROM
    • application processor Boot ROM 과 비슷하게, Secure Enclave Boot ROM 은 변경이 불가능한 code (immutable code) 이다. Secure Enclave 를 위한 "하드웨어 root of trust" 를 확립한다.(establish)
    • device 가 시작될 때, Secure Enclave Boot ROM 이 수명이 짧은 메모리 보호 키(ephemeral memory protection key)를 만든다. 
  • Secure Enclave 는 데이터 보호 키 관리에게 (Data Protection key management) 모든 암호화 기능(cryptographic operations)들을 제공
  • 심지어 커널이 허락한 상태에도(kernel has been compromised) Data Protection 의 integrity (데이터가 변경, 파괴되지 않은 상태)을 유지.
  • AP(Application processor) 와 Secure Enclave 사이의 통신은 interrupt-driven mailbox 와 shared memory data buffer 들과 분리되어 있다.
  • Secure Enclave OS 를 실행
    • Secure Enclave OS
      • "L4 마이크로 커널의 Apple-customized version" 에 기초해서 만들어진 OS
      • Apple 에 의해 sign 된다.
      • Secure Enclave Boot ROM 가 verify
      • 개인의 소프트웨어 업데이트 프로세스를 통해 update 된다.
  • device 가 시작될 때, Secure Enclave Boot ROM 이 수명이 짧은 메모리 보호 키(ephemeral memory protection key)를 만든다. 
    • 이 키(memory protection key)는 기기의 UID 와 얽히게 만들고(entangle), 기기의 memory space 의 "Secure Enclave 부분"을 암호화 할 때 사용된다.
    • 예외적으로 Apple 의 A7 에선, Secure Enclave memory "memory protection key" 로도 인증(authenticated) 이 가능하다. A11과 A11 이후 그리고 S4 SoC 들에서는 "memory protection key" 와 on-chip SRAM 에 저장된 nonce 들에 의해 인증된다.(authenticated)
    • 그리고, A11과 A11 이후 그리고 S4 SoC 들에서 integrity tree 는 보안이 중요한 Secure Enclave memory 의 replay 를 막기위해 사용되어진다.
    Secure Enclave 에 의해 file system 에 저장된 data 는 UID 와 entangled 된 key와 anti-replay counter 로 암호화되어 진다. anti-replay counter 는 dedicated 비휘발성 메모리 IC 안에 저장되어 있다.

    A12 와 S4 SoC 들이 있는 기기들에서, Secure Enclave 는 anti-replay counter storage 를 위해 secure storage IC 와 짝을 이룬다. secure storage IC 는 immutable ROM code, 하드웨어 random number generator, 암호화엔진들, physical tamper detection(물리적인 조작 감지) 과 함께 디자인됐다. counter 들을 읽고 업데이트 하기 위해서, Secure Enclave 와 storage IC 는 counter 들에게 exclusive access 를 보장하는 '안전한 protocol '를 사용한다.

    Secure Enclave 의 "anti-replay 서비스"들은 event 에 사용된 data 의 철회(revocation of data over events)를 위해 사용되어진다.

    이 이벤트들은 anti-replay 의 경계들(boundaries)을 표시 해 준다.
    이벤트는 다음것들을 포함한다. 하지만 제한되진 않는다.
    • Passcode change
    • Touch ID or Face ID enable/disable
    • Fingerprint add/delete
    • Face ID reset
    • Apple Pay card add/remove
    • Erase All Content and Settings
    Secure Enclave 는 또한 지문을 처리하고, Touch ID 와 Face ID 센서들로 부터 오는 얼굴데이터를 처리하는 책임도 진다. 그리고 맞는지 여부를 결정하고, 그리고나서, 유저를 대신해서 access 또는 구매를 가능하게 한다.

    See Also

      1. Apple T2 보안 칩-Mac 보안

        Reference

        1. https://www.apple.com/business/site/docs/iOS_Security_Guide.pdf

        [컴][웹] AdoniJS at Start up

        아도니스 제이에스 / js


        Adonisjs at startup

        app.js

        _loadPreLoadFiles 이전에 this._registerProviders()와 await this._bootProviders()를 호출한다. 이 때 app.js 에 접근해서 Providers 를 가져오고, 이 Provider 의 register() 와 boot() 을 호출한다.

        preloaded files

        아도니스js 에서 처음에 load 하는 file 들은 다음과 같다.(_loadPreLoadFiles)
        • 'start/routes',
        • 'start/events',
        • 'start/socket',
        • 'start/kernel',
        • 'start/wsKernel'
        이 부분은 Ignitor source 에서 확인할 수 있다.
        new Ignitor(require('@adonisjs/fold'))
          .appRoot(__dirname)
          .fireHttpServer()
          .catch(console.error)


        class Ignitor {
          constructor (fold) {
            this._fold = fold
            this._appRoot = null
            this._modulesRoot = null
            this._loadCommands = false
        
            /**
             * Files to be preloaded
             *
             * @type {Array}
             */
            this._preLoadFiles = [
              'start/routes',
              'start/events',
              'start/socket',
              'start/kernel',
              'start/wsKernel'
            ]
        
            /**
             * Default app file
             *
             * @type {String}
             */
            this._appFile = 'start/app.js'
            ...
          }
          ...
          async fire () {
           ...
           this._registerProviders()
           await this._bootProviders()
           ...
           this._loadPreLoadFiles()
          }
        
          async fireHttpServer (httpServerCallback) {
            try {
              await this.fire()
              await this._startHttpServer(httpServerCallback)
            } catch (error) {
              this._printError(error)
            }
          }
        
          /**
           * Return the exported values from the appFile. Also
           * it will validate the exports object to have all
           * required keys.
           *
           * @method _getAppAttributes
           *
           * @return {Object}
           *
           * @private
           */
          _getAppAttributes () {
            return require(path.join(this._appRoot, this._appFile))
          }
        
          /**
           * Registers an array of providers to the Ioc container. This
           * method will make use of the `appFile` to get the providers
           * list.
           *
           * @method _registerProviders
           *
           * @return {void}
           *
           * @private
           */
          _registerProviders () {
            this._callHooks('before', 'providersRegistered')
        
            /**
             * Getting list of providers and registering them.
             */
            const { providers, aceProviders } = this._getAppAttributes()
            const providersToRegister = this._loadCommands ? providers.concat(aceProviders) : providers
            this._fold.registrar.providers(providersToRegister).register()
        
            debug('registered providers')
            this._callHooks('after', 'providersRegistered')
          }
        
          /**
           * Boot providers
           *
           * @method _bootProviders
           *
           * @return {void}
           *
           * @async
           *
           * @private
           */
          async _bootProviders () {
            this._callHooks('before', 'providersBooted')
        
            /**
             * The providers set set on `registrar` when they were registered. We
             * use the same set to boot the previously registered providers.
             */
            await this._fold.registrar.boot()
        
            debug('booted providers')
            this._callHooks('after', 'providersBooted')
          }
        
          ...
          _loadPreLoadFiles () {
            this._callHooks('before', 'preloading')
            ...
        
            this._preLoadFiles.forEach((file) => {
              const filePath = path.isAbsolute(file) ? file : path.join(this._appRoot, file)
        
              /**
               * Require file when it's not optional or when optional
               * file exists
               */
              if (!this._isOptional(file) || this._fileExists(filePath)) {
                require(filePath)
              }
            })
        
            this._callHooks('after', 'preloading')
          }
        }


        [컴][웹] laravel 에서 큰 Database result 를 처리할 때


        Laravel 에서 큰 Database result 를 처리할 때

        아래 글들을 참고하면 된다. 관련 source code 도 확인할 수 있다.

        Fatal error: Allowed memory size of 37748736 bytes exhausted (tried to allocate 72 bytes) in /home/cocktail/apps/cocktail_lumen/vendor/illuminate/database/Eloquent/Model.php on line 279
        

        chunk vs cursor

        chunk 를 사용하면 일반적은 get() 을 사용하는 것보다 memory 를 많이 아낄 수 있다. 이보다 더 확실히 아낄 수 있는 것은 cursor 를 사용하는 것이다.


        [컴][웹] 간단하게 주기적으로 message 를 수신하는 web page

        EventSource / cors / jsonp / different host / subscribe model /


        tornado

        EventSource object | Javascript


        EventSource object 로 server 에 연결(subscribe) 을 해서 주기적으로 event 를 받을 수 있다. 자세한 동작은 일단 생략한다. ref. 2 에서 어느정도 설명을 해준다.


        different domain

        domain 이 다른 곳에 event 를 날려주는 server 가 있어도 무리없이 사용할 수 있다. 보통 html(javascript) 에서 다른 domain 인 경우는 보안을 이유로 ajax 요청이 되지 않는다. 그래서 jsonp 등(일반적으로 Cross-Origin Resource Sharing 이라고 이야기하는 방법)을 이용한다.

        하지만 이 EventSource 는 그런 것의 제약을 받지 않는다. [ref. 1]

        아래처럼 다른 domain 인 경우에는 다른 domain 을 uri 로 적어주면 된다.

        var evtSource = new EventSource("//api.example.com/ssedemo.php", { withCredentials: true } );

        evtSource.addEventListener("ping", function(e) {
          var newElement = document.createElement("li");
         
          var obj = JSON.parse(e.data);
          newElement.innerHTML = "ping at " + obj.time;
          eventList.appendChild(newElement);
        }, false);


        이렇게 다른 domain 에 대한 제약이 없어서 좋은 점은 기존의 web server 와 관계없이 새로운 event 처리를 하는 server 를 사용할 수 있다는 점이다. 그러면 주기적인 push event 등을 처리하는 server 를 따로 둘 수 있다.


        Server side event vs WebSocket

        event driven page 를 만들 땐 SSE 를 사용해도 되고, WebSocket 을 사용해도 된다. 개인적으로는 필요한 부분은 단방향이라서, 양방향 통신이 되는 WebSocket 이 굳이 필요하지 않았다.

        아래는 SSE 와 WebSocket 을 간략하게 정리했다.

        SSE

        1. 2009년 4월 23 일 WHATWG 에서 승인했다. [ref. 7] 
        2. 하지만 SSE 가 좀 더 간편하다. 
        3. 그리고 http protocol 위에서 구현되었다. 
        4. 단방향 통신
        5. client 의 connection 이 종료되었는지 여부를 알 수는 없다.(http 라서 당연한 것일지도.)


        WebSocket

        1. 반면에 WebSocket 은 Tcp/ip 로 다른 port 를 사용한다. 그래서 이 port 가 firewall 에 의해 막혀 있을 수도 있고, 
        2. 이 녀석을 이용하려면, protocol 을 또 정의해야 한다. (ref. 5 에서 좀 더 다양한 의견을 확인할 수 있다.)
        3. 양방향 통신
        from: https://usp.technology/specification/mtp/websocket/websocket-session-handshake.png


        See Also

        1. WebSockets vs Server-Sent-Events vs Long-Polling vs WebRTC vs WebTransport | RxDB - JavaScript Database

        Reference

        1. Using server-sent events - Web APIs | MDN
        2. Stream Updates with Server-Sent Events - HTML5 Rocks
        3. Asynchronous connections - RethinkDB
        4. Build a real time data push engine using Python and Rethinkdb | IMPYTHONIST
        5. SSE vs Websockets - Streamdata.io
        6. Lessons Learned Architecting Realtime Applications | Lincoln Loop
        7. Python and Real-time Web | Eat at Joe's
        8. Tornado server-sent events · GitHub : tornado 로 SSE 구현 예제.
        9. Building RESTful APIs with Tornado | Dr Dobb's

        [컴][웹] V8 에서 JavaScript 의 pipeline

        v8 engine 의 동작 / 동작원리 / 크롬 자바스크립트 엔진 / 크롬 엔진 / 크롬 렌더링 엔진 /


        V8 에서 JavaScript 의 pipeline

        v5.9 이전의 pipeline

        from: https://v8.dev/blog/ignition-interpreter

        원래는 baseline compiler(위의 그림에서 Ignition 과 Full codegen 의 위치에 있는 것이라 여기면 될 듯 하다.) 가 machine code 를 빠르게 만들고, 이 code 가 실행되는 동안에 이 code를 분석하고 일부를 optimizing compiler 가 optimized code 로 다시 compile 한다.

        이 때 사용되는 2개의 optimizing compiler 가 crankshaft, turbofan 이다.

        • TurboFan : Ignition의 bytecode를 바로 최적화된 machine code 로 바꿀 수 있다.[ref. 4]
        • Crankshaft: 소스코드를 다시 컴파일을 해서 최적화된 machine code 를 만든다.[ref. 4]
        참고로, v5.9 부터 Full-codegen 과 Crankshaft 는 사용하지 않는다.[ref. 4]

        Ignition 의 등장

        그런데 이 상황에서 Ignition 을 만들어서 "baseline compiler 가 machine code 를 만드는 것"을 대신해서 Bytecode 를 만들게 했다.

        Ignition 는 처음에 모바일에서 사용하기 위해서 만들었다.[ref. 4]  JIT 가 만든 machine code 의 size 가 커서 메모리를 너무 잡아먹었기 때문이다.  Ignition 에 의해서 chrome tab 마다 메모리를 약 5% 정도 아꼈다.

        Ignition 은 bytecode 를 생성하는 compiler 이고, 이녀석은 이전의 baseline compiler 를 대체한다.  Ignition 이 bytecode 를 만들때도 당연히 최적화를 한다.

        이 Ignition 은 register machine 이다. 이것은 stack machine 과 다르다. 이건 내 생각이지만, 안드로이드의 경험이 덕을 본듯 하다. (stack-based vs register-based)

        Ignition 이 생기면서 고성능의 interpreter 가 생겼고 이 녀석이 Ignition 이 만든 bytecode 를 실행해주는데, 실제웹사이트에서 속도가 이전의 baseline compiler 가  만든 code 의 속도에 근접한다.

        See Also

        1. V8 관련 글들

        References

        1. Ignition · V8 : ignition 에 대한 여러자세한 설명들의 link 들이 있다.
        2. Firing up the Ignition interpreter · V8
        3. Home · v8/v8 Wiki · GitHub
        4. Launching Ignition and TurboFan · V8
        5. TurboFan · V8 : turbofan 에 대한 정보들이 모여 있다.


        [컴][자료] Computer Science 관련 학습 자료

        컴공 공부 자료 / 컴싸 자료 / 컴사 자료 / CS study resource / 공부 자료 / 이북 / ebook / 동영상 강의 / 동강 / study resources /학습 자료 / 커리큘럼 /유투브 자료 / youtube / 공부 / build / cs공부

        ebook

        site

        실습 자료

        컴퓨터공학 커리큘럼 동영상

        build your own 시리즈

        다음 내용들을 만드는 자료들이 있다.

        3D Renderer/ Augmented Reality/ BitTorrent Client/ Blockchain / Cryptocurrency/ Bot/ Command-Line Tool/ Database/ Docker/ Emulator / Virtual Machine/ Front-end Framework / Library/ Game/ Git/ Network Stack/ Neural Network/ Operating System/ Physics Engine/ Programming Language/ Regex Engine/ Search Engine/ Shell/ Template Engine/ Text Editor/ Visual Recognition System/ Voxel Engine/ Web Search Engine/ Web Server/ Uncategorized  

        Computer Graphics