[컴][안드로이드] React Native App Debugger 설치 - vscode


VsCode 에서 React Native Debugger 사용

prerequisite

  • adb 의 path 가 환경변수 PATH 에 들어있어야 한다.

설치 및 실행

  1. vscode 에서 extension 으로 React Native Tools 를 설치한다.
  2. vscode 에 react-native project folder 를 연다.
  3. Debug(Ctrl+D) --> 바퀴모양의 아이콘 클릭 --> lanuch.json 이 보이게 된다. --> Add Configuration --> React Native : Debug Android 선택 (그림2 참고)
  4. 이제 위에서 새롭게 만든 configuration "Debug Android" 를 실행하자. (F5)
    --> React Native Packager 가 실행된다.(하단 바에서 확인가능)
  5. 현재로선 app 에 대한 build/release 는 따로 하고, F5 를 눌러서 app 과 vscode 에서 띄운 React Native Packager 와 연결을 해야 하는 듯 하다.

그림. 1
그림. 2


Chrome Debugger

  1. Debugging · React Native

절차

  1. 크롬을 연다.
  2. --> react-native run-android
  3. --> 폰에 app 이 설치된다.
  4. --> 폰을 app 을 흔들면 In-App Developer Menu 가 뜬다. 
  5. --> Start Remote JS Debugging 을 고른다.
  6. --> chrome 의 console 에 log 가 보인다.

References

  1. GitHub - Microsoft/vscode-react-native: VSCode extension for react native - supports syntax highlighting, debugging and editor integration

[컴][안드로이드] React Native App


updated, 2019-08-11

reddit 에 올라온 댓글 (Flutter: A Framework to Surpass React Native : programming) 을 보면, react native 의 단점을 엿볼 수 있다. 더불어 Flutter 의 장점도 알 수 있다.
글을 보면 Flutter 가 여러모로 나아보인다.


React Native 시작하기

Getting Started · React Native >>  Building Projects with Native Code  >> OS 선택 및 target OS 선택

Windows 에서 Android App 을 만드는 경우에 대한 글이다. 각각의 경우에 대해서는 ref. 1 을 참고하자.


설치

  • Node >= 8.3
  • Python2
  • JDK >= 8
  • React Native command line interface : npm install -g react-native-cli
  • Android Studio 설치, 아래 component 를 전부 설치하자.
    •  Android SDK
    •  Android SDK Platform
    •  Performance (Intel ® HAXM)
    •  Android Virtual Device
  • Android 8.1(Oreo) SDK
    • Android Studio > Tools > SDK manager
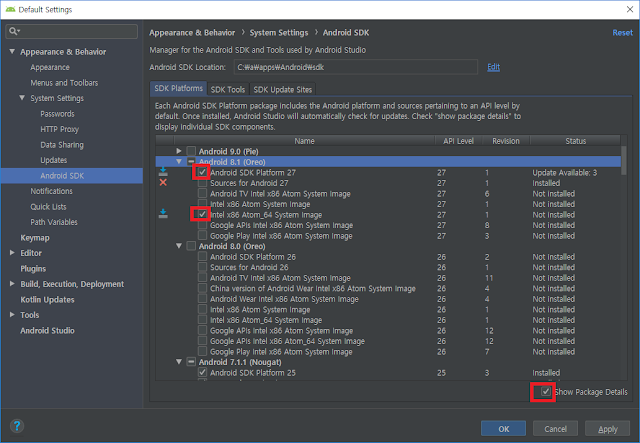
    • Show Package Details 를 클릭 해서, Android 8.1 아래서 다음것들을 check 하고 설치한다.(그림. 1)
      • Android SDK Platform 27
      • Intel x86 Atom_64 System Image or Google APIs Intel x86 Atom System Image
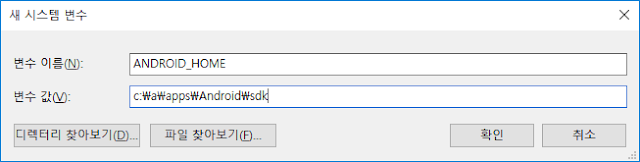
  • 제어판 > 시스템 > 고급시스템설정 (시스템속성) > 고급탭 > 환경변수
    • ANDROID_HOME 이란 변수를 설정해 준다. Android SDK 의 path 를 설정해 주면 된다. path 는 Android Studio 의 Preferences 에서 찾을 수 있다.(Appearance & Behavior → System Settings → Android SDK.)
그림. 1
그림. 2

project 시작하기

project 를 위한 folder 를 하나 만들자. 여기서는 newApp 이라는 이름을 사용하려 한다. 아래처럼 실행한다.
react-native init newApp
아래와 같은 파일들이 만들어진다.
android\
ios\
node_modules\
.babelrc
.buckconfig
.flowconfig
.gitattributes
.gitignore
.watchmanconfig
App.js
app.json
index.js
package.json
package-lock.json


실행

먼저 Android phone 을 USB 로 컴퓨터에 연결하고 USB debugging 이 가능하게 설정해준다.

그다음, 아래처럼 run-android 를 하면 자동으로 build 를 하고 app 을 실행한다.
cd newApp
react-native run-android

Error: Unable to load script from assets index.android.bundle

위처럼 하면, asset bundle 을 load 할 수 없다고 error 가 보인다. 그래서 asset 을 하나 만들어 줘야 한다. 방법은 아래와 같다.

c:\a\programming\nodejs\reactnative\newApp>react-native bundle --platform android --dev false --entry-file index.js --bundle-output android\app\src\main\assets\index.android.bundle --assets-dest android\app\src\main\res
Loading dependency graph, done.
bundle: Writing bundle output to: android\app\src\main\assets\index.android.bundle
bundle: Done writing bundle output

이러면 아래 경로에 index.android.bundle 가 만들어진다.
<newApp>\android\app\src\main\assets\index.android.bundle

이제다시 react-native run-android 를 하면 된다. 참고로, App.js 를 수정한 후에도 다시 위의 react-native bundle ...를 해주고 난 후 run-android 를 해야 한다.


with vscode

참고로 build 시에 vscode 를 열어놓으면 access permission 때문에 작업이 제대로 안되는 경우가 있다. 참고하자.

결과

제대로 실행이되면 아래와 같은 화면이 보인다.


Typescript 사용

이것은 tsx를 js 대신에 사용할 수 있다. 즉, react-native bundle 를 할 때 tsx 를 js로 변경해서 bundling 을 해준다. 그래서 현재 .tsx 에 대해서 따로 .js 파일을 만들지 않는다.
react-native init MyApp --template typescript && node MyApp/setup.js

React-navigation

debugger


References

  1. Getting Started · React Native

[컴] chocolatey 설치


Chocolatey 설치

  1. "관리자 모드"로 cmd.exe를 실행한후 powershell 을 실행한다.
  2. 아래 명령어를 실행한다.(자세한 내용은 여기를 참고)
    Set-ExecutionPolicy Bypass -Scope Process -Force; iex ((New-Object System.Net.WebClient).DownloadString('https://chocolatey.org/install.ps1'))
    
    
  3. 그러면 "c:\ProgramData\chocolatey" path 에 설치된다.
  4. uninstall 은 여기 를 참고하자.


Microsoft Windows [Version 10.0.14393]
(c) 2016 Microsoft Corporation. All rights reserved.

C:\Windows\system32>powershell
Windows PowerShell
Copyright (C) 2016 Microsoft Corporation. All rights reserved.

PS C:\Windows\system32> Set-ExecutionPolicy Bypass -Scope Process -Force; iex ((New-Object System.Net.WebClient).DownloadString('https://chocolatey.org/install.ps1'))
Getting latest version of the Chocolatey package for download.
Getting Chocolatey from https://chocolatey.org/api/v2/package/chocolatey/0.10.11.
Extracting C:\Users\namh\AppData\Local\Temp\chocolatey\chocInstall\chocolatey.zip to C:\Users\namh\AppData\Local\Temp\chocolatey\chocInstall...
Installing chocolatey on this machine
Creating ChocolateyInstall as an environment variable (targeting 'Machine')
  Setting ChocolateyInstall to 'C:\ProgramData\chocolatey'
WARNING: It's very likely you will need to close and reopen your shell
  before you can use choco.
Restricting write permissions to Administrators
We are setting up the Chocolatey package repository.
The packages themselves go to 'C:\ProgramData\chocolatey\lib'
  (i.e. C:\ProgramData\chocolatey\lib\yourPackageName).
A shim file for the command line goes to 'C:\ProgramData\chocolatey\bin'
  and points to an executable in 'C:\ProgramData\chocolatey\lib\yourPackageName'.

Creating Chocolatey folders if they do not already exist.

WARNING: You can safely ignore errors related to missing log files when
  upgrading from a version of Chocolatey less than 0.9.9.
  'Batch file could not be found' is also safe to ignore.
  'The system cannot find the file specified' - also safe.
chocolatey.nupkg file not installed in lib.
 Attempting to locate it from bootstrapper.
PATH environment variable does not have C:\ProgramData\chocolatey\bin in it. Adding...
경고: Not setting tab completion: Profile file does not exist at
'C:\Users\namh\Documents\WindowsPowerShell\Microsoft.PowerShell_profile.ps1'.
Chocolatey (choco.exe) is now ready.
You can call choco from anywhere, command line or powershell by typing choco.
Run choco /? for a list of functions.
You may need to shut down and restart powershell and/or consoles
 first prior to using choco.
Ensuring chocolatey commands are on the path
Ensuring chocolatey.nupkg is in the lib folder
PS C:\Windows\system32>


chocolatey 사용

아래처럼 사용하면 된다. 아래는 python2 를 설치하는 command 이다. 이러면 python2 의 msi 를 download 해서 "c:\python27" 에 install 을 한다. msi 로 설치해서 당연히 제어판 "프로그램 및 기능" 에도 보인다.
choco install -y python2

package 정보 확인

아래와 같은 방법으로 package description 등을 확인할 수 있다. parameter 같은 것들을 알 수 있다.
choco search vscodium -v

update

choco upgrade vscodium --params "/NoAddContextMenuFiles /NoAddContextMenuFolders"

.config 를 이용해서 install

choco install packages.config -y
<?xml version="1.0" encoding="utf-8"?>
<packages>
  <package id="7zip" />
  <package id="7zip.install" />
  <package id="apache-httpd" />
  <package id="chocolatey" />
  <package id="chocolateygui" />
  <package id="dataram-ramdisk" />
  <package id="totalcommander" />
  <package id="lockhunter" />
  <package id="sublimetext3" />
  <package id="sumatrapdf" />
  <package id="sumatrapdf.install" />
  <package id="TcpView" />
  <package id="telegram.install" />
  <package id="launchyqt" />
  <package id="irfanview" />
  <package id="Firefox" packageParameters="/NoTaskbarShortcut /NoDesktopShortcut /RemoveDistributionDir"/>
  <package id="git" />
  <package id="git-lfs" />
  <package id="git-lfs.install" />
  <package id="git.install" />
  <package id="glogg" />
  <package id="heidisql" />
  <package id="vscodium.install" packageParameters="/NoDesktopIcon /NoAddToPath /NoAddContextMenuFolders /NoAddContextMenuFiles /AssociateWithFiles /NoAddToPath"/>
  <package id="bitvise-ssh-client" />
  <package id="mariadb.install" />
  <package id="microsoft-windows-terminal" />
  <package id="powertoys" version="0.17.0" />
  <package id="elevate.native" />
</packages>

package가 설치되는 path 를 변경

choco install mariadb.install -ia "INSTALLDIR=d:\a\apps\mariadb"

Windows Package Manager

See Also

  1. Microsoft announces official Windows package manager. 'Not a package manager' users snap back • The Register, 2020-05-20

References

  1. Chocolatey Installation

[컴][Hack] Visual Studio C/C++ compiler 로 compile 하기

Visual Studio C/C++ compiler 로 compile 하기


Visual Studio C/C++ compiler 로 compile 하기

환경

  • Visual Studio Community 2015

compile

cmd 창을 열고 일단 vsvarsall.bat 를 실행해 주자. 이녀석이 필요한 환경 변수등을 세팅해준다.
"c:\Program Files (x86)\Microsoft Visual Studio 14.0\VC\vcvarsall.bat"

그리고 아래처럼 compile 을 하면 된다.
"c:\Program Files (x86)\Microsoft Visual Studio 14.0\VC\bin\cl.exe" my.cpp

assembler

만약 assembler 를 보고 싶다면, /Fa option 을 사용하면 된다.
"c:\Program Files (x86)\Microsoft Visual Studio 14.0\VC\bin\cl.exe" my.cpp /Famy.asm

x86_amd64

64 bit 으로 compiler 는 x86_amd64 에 있다. amd64_x86 라는 folder 도 있는데, 차이는 찾아보지 않아서 일단 패스.
c:\Program Files (x86)\Microsoft Visual Studio 14.0\VC\bin\x86_amd64\vcvarsx86_amd64.bat
"c:\Program Files (x86)\Microsoft Visual Studio 14.0\VC\bin\x86_amd64\cl.exe" my.cpp


See Also

  1. x86 opcode: http://ref.x86asm.net/coder32.html#x83
  2. x86/add: https://www.felixcloutier.com/x86/add
  3. intel sw development manual: http://x86asm.net/links/index.html#intel_man


[컴][윈도우] 태스크바의 Windows Ink 끄기

Windows Ink turn off / taskbar //


Windows Ink 를 taskbar 에서 안보이게 하기

Windows 10 Anniversary Update 가 설치되면서 Windows Ink 가 task bar 에 보이기 시작했다. 개인적으로 이런것을 싫어해서 삭제를 했다.

taskbar 에서 안보이게 하기

  1. taskbar 에서 마우스 오른쪽 버튼
  2. Windows Ink 작업 영역 단추 표시 끄기

기능 사용 안하기

  1. gpedit.msc
  2. 컴퓨터 구성(Computer Configuration.) > 관리 템플릿 > Windows Ink Workspace.
  3. Windows Ink 작업 영역 허용 의 상태를 '사용 안 함' 으로 변경
  4. restart

References

  1. How to disable Windows Ink Workspace on Windows 10 | Windows Central