gmail attachment download / 지메일 / at once /지메일 첨부파일 백업방법
gmail 첨부파일 한번에 다운로드 하는 법
gmail 의 메일중 첨부파일이 있는 것들이 있다. 이것들을 전부 한번에 다운로드 받는 툴이다.
절차:
- settings 에서 계정 설정을 한다.
- folder/files –> Selected Folders –> 이름에 들어갈 필드 정하기 –> 하단에서 원하는 folder 선택 –> download

gmail attachment download / 지메일 / at once /지메일 첨부파일 백업방법
gmail 의 메일중 첨부파일이 있는 것들이 있다. 이것들을 전부 한번에 다운로드 받는 툴이다.
절차:
미크로틱, 라우터 /
starting kernel –> routerboard 나오고 멈추거나 여기서 꺼지고 계속 다시 starting kernel 이 뜬다.
원래는 starting kernel 하고 나서 starting services 가 보여야 한다.
미리 netinstall, package 를 아래 링크에서 download 하자. ’RB3011UiAS-RM’의 RouterOS는 arm 버전을 받으면 된다.
system reset-config 를 실행하면 된다. 참고로 암호도 초기화
된다.다음 글에서 보듯이, AWS 가 public ip address 에 과금을 시작한다.
그래서 어떤 부분이 부과되는지에 대해 확인해봤다.
과금되는 주소들:
과금확인 :
https://aws.amazon.com/blogs/networking-and-content-delivery/identify-and-optimize-public-ipv4-address-usage-on-aws/ : 얼마나 자신이 갖고 있는 public ip 가 사용됐는지 과금표에서 볼 수 있다.
wslg path
windows <--> linux를 통해 처리한다.자세한 사항은 ref.1 을 참고하자.
Get-AppxPackage MicrosoftCorporationII.WindowsSubsystemForLinux
C:\Program Files\WindowsApps\MicrosoftCorporationII.WindowsSubsystemForLinux_1.2.5.0_x64__8xxxxxxxxewsl.exe, wslg.exe 등이
설치된다.c:\Windows\System32\lxss\toolsHKCU:\Software\Microsoft\Windows\CurrentVersion\Lxssuser distro 에서 ls /mnt/wslg 를 하면 WSLg System distro
부분을 확인할 수 있다.
트래픽 / 대용량 /대규모 / 네트워크 traffic / 디도스
from ref.3:
http2 는 end user 가 다른 곳으로 가거나, data 교환을 멈추게 할 수 있는데, 그래서 stream 을 cancel 할 수 있는 방법을 제공한다.
그래서 공격자는 connection 을 열고, 여기서 stream 을 시작하고 바로 stop 을 시키는 것을 반복한다.(RST_STREAM) 그래서 connection 하나에서 사용가능한 stream 한계치를 넘어서서 stream 을 보내게 된다. 이것이 서버가 서비스를 못하게 만든다(denial of service)
대략 2천대의 시스템으로 구성된 bot net 이 관련되어 있다. 이렇게 작은 botnet 크기로도 큰 볼륨의 request 를 만들 수 있다는 것이 이 취약점이 보호되지 않은 네트워크에 얼마나 위협적인지 알려준다.
만약 http2를 이용해서 https://daum.net 으로 GET request 를 보내면, 이때는 stream ID 1 를 통해 교환된다. 이때 client 가 1개의 HEADERS 1 frame 을 서버로 보내면, 서버는 1개의 HEADERS frame 붙여서 1개이상의 DATA Frame 을 붙여서 보낸다. 그리고 client 가 다른 request를 서버로 보내면, 그것은 HEADERS 3 이 되고, 서버는 이것에 대한 응답을 DATA stream 1 뒤에 붙여서 보낸다. 이것이 스트림의 multiplexing이고, concurrenct 이다.
이것이 http2의 강력한 기능인데, 이로인해 client 가 동시에 많은 request를 보낼 수 있게 되는데, 그러면 peak 시점의 server resource 가 더 많이 필요하게 된다.
module 은 wrapper function 같은 느낌이다. terraform 에서 제공하는 hashicorp aws 로도 해결이 되지만, module 을 사용해서 좀 더 간단한 설정을 가능하게 해준다.
개인적인 생각은 같은 pattern 이 많아지면 사용하면 좋을 듯 하다. 그
전에 사용하는 것은 terraform 의 이해를 떨어뜨리는 듯 하다.
terraform module 들은 다음 링크에서 확인할 수 있다.
module 은 argument 들을 가지고 있는데, required 만 채워넣으면 된다.
아래처럼 source를 적어주는데, directory 를 적어준다.
module "db_parameter_group_2" {
  source = "../../modules/server/db/db_parameter_group/"
}아래처럼 module 이 있는데, 이렇게 만들고 나서
terraform init 을 다시 해줘야 module 을 인식한다.
├───environments
│   └───dev
│       ├───.terraform
│       └─── main.tf
|
├───generated
│   └───aws
│       ├───auto_scaling
│       ├───ec2_instance
│       ├───ec2_instance00
│       └───rds
└───modules
     └───db
         ├─── main.tf
         ├─── variable.tf
         └─── output.tf
curl gui / curl 대신 / 대안 / alternatives / 도구 / tool /curl 대신 사용할 gui툴 /
기본적으로 ebpf 에서 직접적으로 돌아가는 code를 만드는 것은 잘 하지 않는다고 한다. 대체로 framework 를 통해서 coding 을 한다. bcc, bpftrace 같은 tool 도 iovisor 라는 framework 위에 만들어졌다.[ref. 1]
ref. 1 의 예제를 보면, tcp 통신에서 보내고, 받은 bytes 를 보여주는 program, tcplife 가 나온다. 이것을 기존의 kernel technology 로 만들 수 있는데, 그러면 performance overhead 가 더 생길 것이고, security issue 도 있을 것이라 한다.
packet 수 보다는 적은 TCP session event 만 trace 한다. 그래서 모든 packet 을 trace 하는 것보다 overhead 를 줄인다.
bcc tools 같은 기능을 원하는대로 변경(customize)하려면, bpftrace 를 사용할 수 있다. bcc 만큼 자유롭게 customize 할 수는 없다.
wsl2 linux kernel source 를 받아서 wsl2 ubuntu 에서 build 한다.
다음 link 에서 kernel source 를 받자.
build 를 위한 config 설정
Microsoft/config-wsl 를 <proj_root> 에 copy 해 와서 flag 를 설정하면 된다.build
cpu : i5-9400F @ 2.9GHz
wsl2 에서 build, 대략 27분 소요
<proj_root>\vmlinux : build 후 생성된 kernel
sudo apt install build-essential flex bison dwarves libssl-dev libelf-dev
tar xvf WSL2-Linux-Kernel-linux-msft-wsl-5.10.74.3.tar.gz
cd WSL2-Linux-Kernel-linux-msft-wsl-5.10.74.3

# 만약, 커널 버전 이름을 변경하고 싶다면, 아래처럼 하면 된다. 굳이 수정할 필요는 없다.
# export KERNELRELEASE=5.10.74.3-microsoft-standard
# make KCONFIG_CONFIG=Microsoft/config-wsl KERNELRELEASE=$KERNELRELEASE -j 4

sudo apt-get install flex bison libssl-dev libelf-dev dwarves

cp ./Microsoft/config-wsl .config
# config path 설정은 아래처럼 할 수 있다.
# make KCONFIG_CONFIG=Microsoft/config-wsl -j 4
make -j 4
make modules -j 4
sudo make modules_install
ls /lib/modules/ : /lib/modules 가 만들어진다.
새로 build 한 kernel 을 사용하도록 설정
vmlinux를 windows 로 복사mkdir /mnt/c/Users/myuserid/kernel
cp vmlinux /mnt/c/Users/myuserid/kernel/vmlinux-5.10.74.3c:\Users\myuserid\.wslconfig 설정[wsl2]
kernel=c:\\Users\\myuserid\\kernel\\vmlinux-5.10.74.3새롭게 wsl2 시작
wsl --shutdown
wsl -d Ubuntu-20.04
...
# kernel version 확인
uname -r
5.10.74.3-microsoft-standard-WSL2sudo apt-get update
sudo apt-get install bpfcc-tools
sudo opensnoop-bpfccopensnoop-bpfcc 를 켜놓은 상태에서 curl 을 한번 쳐보면, 이 tool이 어떻게 동작하는지 볼 수 있다.
opensnoop 은 `open()`` syscall에 대해 한 줄의 출력을 print 한다. 이렇게 어떤 file 이 open 됐는지를 보면서, data file 들, config filed 들 , log file 들이 무엇인지 확인할 수 있다.(참고: 1.2. opensnoop | bcc/docs/tutorial.md)
/etc/wsl.conf 에서 수정
/etc/wsl.conf 가 존재하지 않으면 만들면 된다.[user]
default=username특정 userid 로 wsl 실행시 :
wsl -d <distribution_name> -u root
ubuntu config --default-user johndoe
eBPF 는 Berkeley Packet Filter에 e(extend)를 붙여서 만든 이름인 듯 하다. wiki 의 내용을 보면 BPF 는 network traffic 분석용으로 많이 쓰였던 것 같다.
이 부분이 확장돼서 이제는 kernel mode 에서 실행돼야 하는 script 를 실행할 수 있게 해주는 기술이 됐다.
이전에 kernel 에 기능을 넣으려면, code 를 수정해서 다시 빌드 하던지, kernel module들을 load 해야 했다.[ref. 1]
static code analysis 와 crash, hang 또는 다른 kernel 에 부정적인 영향을 미치는 것들을 reject 하는 것으로 안정성(safety)을 제공한다.
자동으로 거부되는 프로그램의 예
verifier를 통과한 loaded program 은, 빠른 성능을 위해서, interpreted 되거나 in-kernel JIT compiled 된다. 그리고 나서, program들은 os kernel 의 여러 hook point 들에 attached 돼서 event 가 발생할 때 실행된다.
대략적인 개념은
system call 에서 함수를 호출할 때 마다, eBPF 함수를 호출하도록 만들어 놓은 듯 하다. 그래서 정의된 handler 가 없으면, 그냥 넘어가고, 있으면 실행하게 되는 듯 하다.
windows 에서도 ebpf 를 만들고 있다. 기존 ebpf 위에 layer를 추가해서 windows 에서도 실행되도록 한다.
지원버전:
#!/usr/bin/python3
from bcc import BPF
from time import sleep

program = """
BPF_HASH(clones);

int hello_world(void *ctx) {
    u64 uid;
    u64 counter = 0;
    u64 *p;

    uid = bpf_get_current_uid_gid() & 0xFFFFFFFF;
    p = clones.lookup(&uid);
    if (p != 0){
        counter = *p;
    }

    counter++;
    clones.update(&uid, &counter);

    return 0;
}
"""

b = BPF(text=program)
clone = b.get_syscall_fnname("clone")
b.attach_kprobe(event=clone, fn_name="hello_world")
b.trace_print()

sleep(1000)

while True:
    sleep(2)
    s = ""
    if len(b["clones"].items()):
        for k,v in b["clones"].items():
            s += "ID {}: {}\t".format(k.value, v.value)
        print(s)
    else:
        print("No entries yet")
ps example / powershell kill process / example / kill tree ps
function Kill-Tree {
    Param([int]$ppid)
    Get-CimInstance Win32_Process | Where-Object { $_.ParentProcessId -eq $ppid } | ForEach-Object { Kill-Tree $_.ProcessId }
    Stop-Process -Id $ppid
}

function Kill-Process {
    # kill the processes which have the same names
    Param([String]$pname)
    echo "kill $pname"
    $pids=(get-process $pname).id
    For ($i=0; $i -lt $pids.length; $i++){
        $pi = $pids[$i]
        Kill-Tree $pi
    }
}


Kill-Process "Adobe Desktop Service"
Kill-Process "AdobeIPCBroker"
Kill-Process "Creative Cloud Helper"
Kill-Process "CCXProcess"
Kill-Process "CCLibrary"
Kill-Process "CoreSync"
db index / index 가 저장되는 방법
ref.1 의 storage and retrieval 부분을 정리중…
compaction 과 merge:
hash table 한계:
SSTable:
이제 storage engine 이 동작은 이렇게 하게 된다.
결과적으로, 하나의 SSTable 에는 특정시간동안 쌓인 key 들이 있게 된다.
read 를 처리할때는
먼저 memtable 에서 key를 찾는다.
여기에 없으면, 가장최근의 disk segment 로 간다. 거기도 없으면, 그 다음 오래된 segment 로 가서 key 를 찾게 된다.
때떄로 merge 및 compaction process 를 backgroud 에서 실행한다. 이 때 SSTable 이 줄어든다.
이것을 실행해서, segment 파일들을 merge하고, overwritten 된 값이나 delted 된 값들을 버린다.
이때 만약 memtable 이 날라갈 때를 대비해서, write 될때 그냥 sequential 한 log 를 남기는 것으로 이 문제를 어느정도 커버할 수 있다. 그리고 이 로그는 SSTable 를 만들때 discard 하면 된다.
gmail 에서 data backup 을 하면, .mbox 형식으로 다운로드 할 수 있다. 이것을 읽어드려서 보려면, mbox viewer 로 잠깐 demo 기간만 이용해도 된다.
개인적으로 처리방법을 찾아봤다. 무료로 html 로 변화해주는 것들을 찾아봤는데, linux 용으로 몇개가 보였다. 한개는 c 로 만든 것이라 compile 해야 해서 일단 pass 했다.
이것저것 찾다가 간단하게 python 으로 된 녀석을 찾았다.
pip install mailbox bs4 lxml 이 필요이것으로 읽어서 원하는 모양으로 output 을 만드는 것이 가장 나은 선택일 듯 싶다.
jooq란?/
여기서는 jooq 를 사용하는데, jooq gradle plugin 을 이용해서 사용한다.
jooq 팀에서도 Grdle plugin 을 쓰는 것을 권장한다.
여기서는 gradle-jooq-plugin 의 README.md 의 내용을 기초로 사용법을 설명한다.
가장 간단한 예제는 아래와 같다.
generationTool여기서는 mariadb와 연동되는 springboot 에 적용해서 mariadb 의 table, record 관련된 class 를 generationTool 을 사용해서 만드는 작업을 해보려 한다.
먼저, 다음링크를 참고해서 springboot 을 준비하자.
jooq.gradle : 여기에 다음처럼 *.gradle 파일을 추가하자. 그냥 build.gradle 에 전부 넣을 수도 있다. 그것은 여기를 참고하자.
build.gradle...
apply from: 'jooq.gradle'
...jooq.gradle:
database.inputSchema 를 지정해주지 않으면, 전체 database 에 대해 class 를 생성한다.database.include, database.exclude : code generation 할때, include, exclude 조건을 넣을 수 있다. 예를 들면, 특정 이름의 table 에 대한 code generation 을 하거나 할 수 있다. 자세한 것은 Includes and Excludes 를 참고하자.import nu.studer.gradle.jooq.JooqEdition
buildscript {
repositories {
gradlePluginPortal()
}
dependencies {
classpath 'nu.studer:gradle-jooq-plugin:8.2'
}
}
apply plugin: nu.studer.gradle.jooq.JooqPlugin
repositories {
mavenCentral()
}
dependencies {
// mariadb 가 아니라면, 다른 client 를 사용하게 된다.
jooqGenerator 'org.mariadb.jdbc:mariadb-java-client'
}
jooq {
configurations {
main {
generationTool {
logging = org.jooq.meta.jaxb.Logging.WARN
jdbc {
url = 'jdbc:mariadb://localhost:3307/stest?useUnicode=true&characterEncoding=utf-8'
user = 'root'
password = 'root'
driver = 'org.mariadb.jdbc.Driver'
properties {
property {
// 이건 그냥 자신이 원하는 변수를 지정하는 부분으로 보면된다.
key = 'PAGE_SIZE'
value = 2048
}
}
}
generator {
name = 'org.jooq.codegen.DefaultGenerator'
database {
name ='org.jooq.meta.mariadb.MariaDBDatabase'
inputSchema = 'stest' // 이것을 지정해주면, 여기 지정된 database의 schema 의 class 만 만든다.
include = '.*'
exclude = 'flyway_schema_history'
}
target {
packageName = 'com.namh.namhex'
}
strategy {
name = "org.jooq.codegen.DefaultGeneratorStrategy"
}
}
}
}
}
}gradlew.bat generateJooq 를 실행하면 class file 들이 만들어진다.
com.namh.namhex 이기에 다음경로에 DB table, record에 대한 class file 이 다음 경로에 만들어진다.
<root>\build\generated-src\jooq\main\com\namh\namhexd:\namhex000>gradlew generateJooq
> Task :generateJooq
SLF4J: No SLF4J providers were found.
SLF4J: Defaulting to no-operation (NOP) logger implementation
SLF4J: See https://www.slf4j.org/codes.html#noProviders for further details.
Deprecated Gradle features were used in this build, making it incompatible with Gradle 9.0.
You can use '--warning-mode all' to show the individual deprecation warnings and determine if they come from your own scripts or plugins.
For more on this, please refer to https://docs.gradle.org/8.2.1/userguide/command_line_interface.html#sec:command_line_warnings in the Gradle documentation.
BUILD SUCCESSFUL in 5s
1 actionable task: 1 executeddb에 접속해서 table의 schema 를 얻는 것이 아니라 local 에 있는 schema 를 이용해서 만들수도 있다.
boilerplate /
간단하게, MariaDB 를 사용하는 Rest API 서버를 만들기 위한 기본 setting 이라고 보면 된다.
application.yml 설정
gradlew.bat bootRunSpring Initializr 설정:
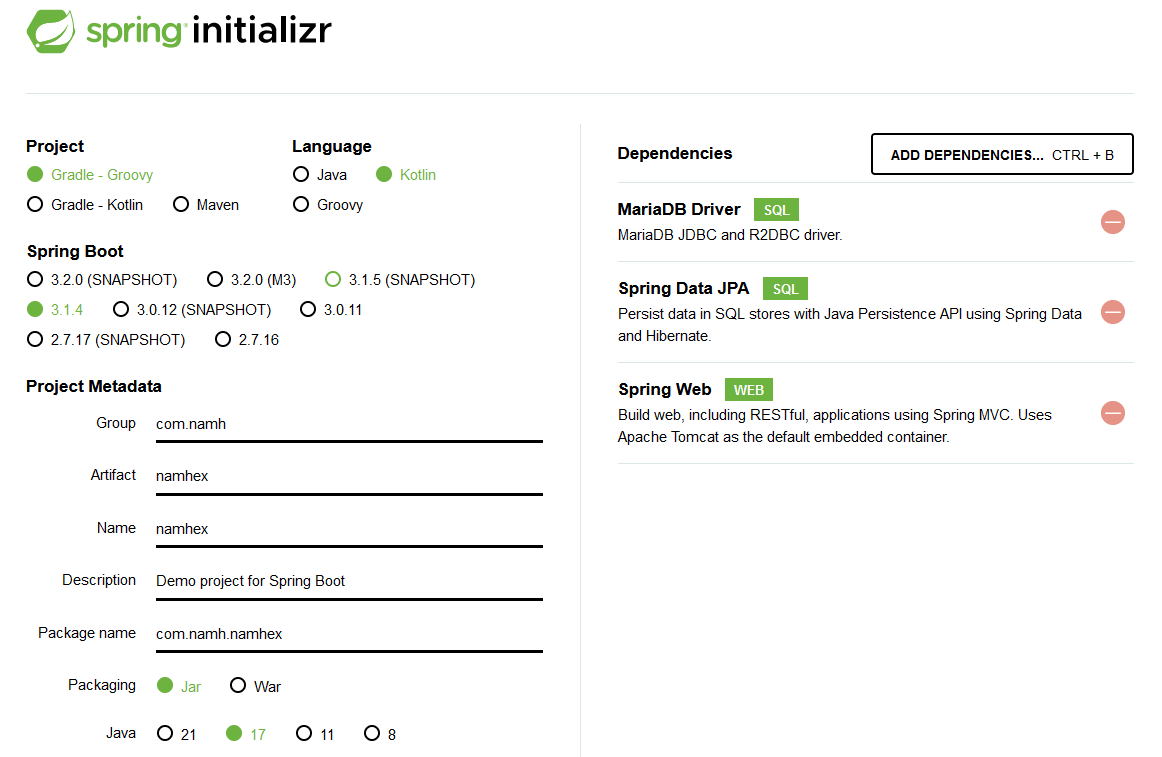
build.gradle:
dependencies {
    implementation 'org.springframework.boot:spring-boot-starter-data-jpa'
    implementation 'org.springframework.boot:spring-boot-starter-web'
    implementation 'com.fasterxml.jackson.module:jackson-module-kotlin'
    implementation 'org.jetbrains.kotlin:kotlin-reflect'
    runtimeOnly 'org.mariadb.jdbc:mariadb-java-client'

    testImplementation 'org.springframework.boot:spring-boot-starter-test'
}spring-boot-starter-webspring-boot-starter-web 가 있어야 서버로서 동작한다. 저
library 가 없으면, 그냥 한번 실행하고, exit(shutdown) 하게 된다.
spring - Springboot Application exits immediately - Stack Overflow
spring.profiles.active : Spring
Boot Reference Documentationspring.config.activate.on-profile(2.4 이전엔
spring.profiles였다.) : Spring
Boot Reference Documentation# application.yml
server:
port: 9100
spring:
profiles:
active: dev
---
spring:
config:
activate:
on-profile: "dev"
datasource:
url: >
jdbc:mariadb://localhost:3307/stest?
useUnicode=true&characterEncoding=utf-8
username: root
password: root
driver-class-name: org.mariadb.jdbc.Driver
hikari:
maximum-pool-size: 5spring.jpa.hibernate.ddl-autospring.jpa.hibernate.ddl-auto
property에 대한 설명, 이것은 hibernate 의 feature(기능) 이다. 그래서
만약 접속하는 table 이 존재하지 않을때 create 을 하는 등의 행동을 하도록
할 수 있다.create, create-drop, update,
validate, node 에 대한 설명:
create : Hibernate에게 애플리케이션이 시작될 때마다
데이터베이스 스키마를 삭제하고 다시 생성하도록 지시spring-boot-devtools다음처럼 spring-boot-devtools을 추가하면 된다. 그리고
서버를 실행하면 아래 그림처럼 LiveReload server 가 running 하고 있다는
message를 확인할 수 있다.
dependencies {
    ...
    developmentOnly 'org.springframework.boot:spring-boot-devtools'
}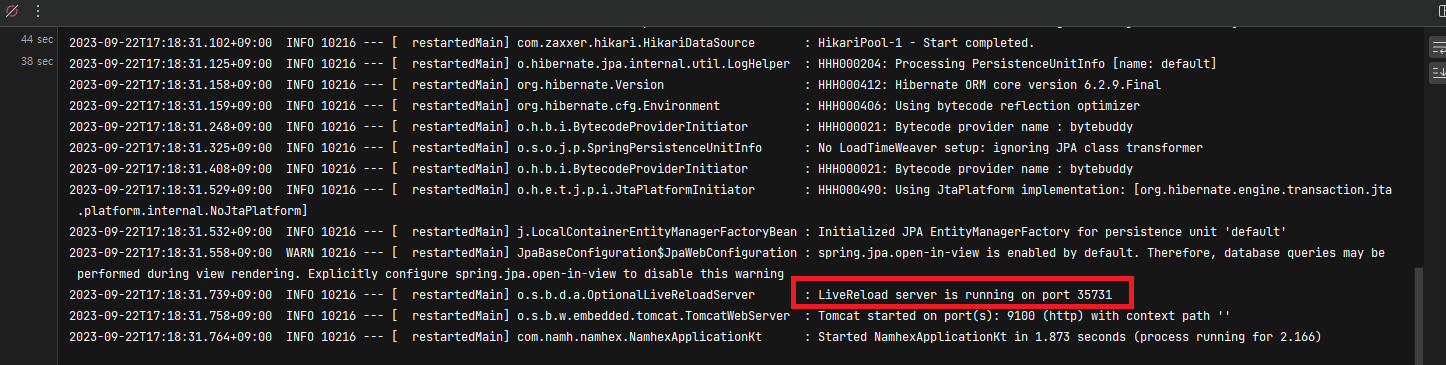
참고로, 2개 이상의 spring boot 을 띄우고 있다면, 이미 port 를 사용하고 있어서 LiverReload server가 run 할 수 없는 경우도 있다. 이때는 port 를 변경해주면 된다.
...
---
spring:
  ...
  devtools:
    livereload:
      port: 35731
  ...
package manager
위 link 를 보면, 이 tool 이 하는 역할을 이해할 수 있다. 대략적으로 oh-my-zsh의 plugin manager 의 역할을 한다고 보면 될 듯 하다.
oh-my-zsh 는 한 repository 의 directory 에서 여러개의 plugin 을 관리하고 있다.
그런데 이것보다 나은 plugin management system 이 필요했는데, 진전이 없어서 이 Antigen을 만들었다고 한다.
이 Antigen 은 다양한 github repo 에서 필요한 plugin 을 가져온다고 한다.
pacman -S gitantigen.zsh 만 있으면 된다.
antigen.zsh 를 설치하고, .zshrc 를 작성후 재실행하면 된다.
curl -L git.io/antigen > antigen.zsh
# or use git.io/antigen-nightly for the latest version

mv ./antigen.zsh ~/.omz/~/.zshrc:
source ~/.omz/antigen.zsh

# Load the oh-my-zsh's library.
antigen use oh-my-zsh

# Syntax highlighting bundle.
antigen bundle zsh-users/zsh-syntax-highlighting

# Load the theme.
antigen theme borekb/agkozak-zsh-theme@prompt-customization

# Tell Antigen that you're done.
antigen apply처음 실행하면, antigen 을 적용한 후, prompt 가 보이지 않는다. 이럴때는 그냥 새 창을 띄우면 된다.
ctrl+shift+p) 를 열자Open settings file (JSON) 을 선택이 때 guid 의 생성은 다음 link 를 참고하자.
profile:
{
    "commandline": "d:\\msys64\\msys2_shell.cmd -defterm -here -no-start -mingw64 -shell bash",
    "guid": "{2ece5bfe-50ed-5f3a-ab87-5cd4baafed2b}",
    "hidden": false,
    "name": "msys2 bash"
}bash 대신 zsh 를 사용하고 싶다면,
pacman -S zsh 을 하면 zsh 이 설치된다.d:\\msys64\\msys2_shell.cmd -defterm -here -no-start -mingw64 -shell zshvs code 에서 bash 사용 / zsh 사용
vscode 는 container 에 접근해서 사용할 수도 있다.
다만 이것은 여러모로 memory/storage 를 많이 먹는다. 그래서 msys2 를 이용한 방법이 있어서 사용해 본다.
여기선 vscode 의 기본 terminal 을 msys2 가 제공하는 콘솔을 사용하도록 설정할 것이다.
<msys64>\msys2.exe 실행pacman -Syu : package repo database update,Preferences: Open User Settings (JSON) 으로 가자.msys2 를 download 하고 설치후, <msys64>\msys2.exe 를 실행하면 된다. 이 환경은 posix emulator 라고 보면 된다. 여기서 원하는 package들을 설치해서 사용할 수 있다.
먼저 pacman -Syu 을 통해 pakage 를 update 하자. 여러번 실행해야 할 수 있다.
pacman -Syu : package repo의 data 를 update, 여러번 실행해야 한다.이제 bash 가 같이 설치됐다. (경로: <msys64>\usr\bin\bash.exe)
이제 vscode 의 terminal 의 default 값을 BASH 로 바꾸는 작업을 해주자.
아래처럼 setting 을 추가한다. 그러면 terminal panel(control+`) 에서 ’BASH’를 사용할 수 있게 된다.
아래는 msys2 를 C:\\msys64에 설치했을때의 설정이다.
"terminal.integrated.profiles.windows": {
   "BASH": {
       "path": "C:\\msys64\\usr\\bin\\bash.exe",
       "args": [
           "--login",
           "-i"
       ],
       "env": {
           "MSYSTEM": "MINGW64",
           "CHERE_INVOKING": "1",
           "MSYS2_PATH_TYPE": "inherit"
       }
   }
},
"terminal.integrated.defaultProfile.windows": "BASH",
"git.path": "C:\\msys64\\usr\\bin\\git.exe", // --> 이건 그냥 git for windows 를 설치해서 사용해도 된다.zsh windows / msys / wsl 없이
msys2 환경에서 실행되는 zsh 를 이용한다고 보면 된다.
이미 git for windows 가 msys2 환경이 같이 설치된다. [ref. 1] 그러므로 이것을 이용한다.
다음 경로에서 windows 용 zsh 를 download 할 수 있다.
여기서 download 한 내용을 git for windows folder 에 copy 해 넣으면 된다.
usr, etc folder 가 있는데, git for windows 의 folder와 맞춰서 copy 해 넣으면 된다.
ref.1 에선 msys2 를 설치하고, 그 안에 git for windows 까지 같이 넣어서 사용하는 방법을 보여준다.
c:\msys64\msys2.exe 를 실행하면 shell 이 뜬다.pacman -Syu 를 통해 pacakage database 를 최신으로 update 할 수 있다. 참고로 여러번 반복해야 한다.pacman -S zsh 으로 zsh 을 설치할 수 있다.다음 util 을 사용할 수 있다.